Get the code here: blog-box
Introduction
I recently came across this awesome list for pinned gists and it piqued my curiosity. So this is basically a collection of repositories that allow you to automatically update a gist periodically with some information. This gist can then be pinned to your GitHub page for people to see when they visit your profile.
For those of you that havent heard of gists, they’re a service provided by GitHub, you can check it out here. They’re basically a collection of files that can be forked and cloned like a GitHub repo.
These periodically updating pinned gists have a nickname, boxes. Some examples of what you can put on these gists from awesome-pinned-gists include, your most recent tweet, weekly music listening report, books you’re currently reading, etc.
Basically if you know a service that has an API you can display it on a pinned gist. In this tutorial I’ll show you how to create a gist that updates regularly with Your latest Dev.to blog post, but this method can be adapted for any service with an API. You’re only limited by your imagination and publicly available APIs.
Setup
This tutorial will have four parts-
- Setup all the prerequisites before you start coding.
- Programatically update a gist.
- Get data from the API and update the gist.
- Setup a GitHub workflow to auto update.
1. Prerequisites
Create a GitHub token
Create a new personal access token at https://github.com/settings/tokens and remember to save the token somewhere because you can only see it once.
Creating the Gist
The first thing we need to do is create a gist. So go to https://gist.github.com/ and make one, create a file, name it whatever you want, and add whatever description and content you want for now. You’ll need to add some content to the file because you can’t create an empty gist.
Once you’ve created a gist, the url will look something like this https://gist.github.com/<username>/ <gist id>. Copy this gist id and keep it somewhere for later use.
Setup the project
Create a new repository on GitHub, clone it to your local setup and make it your working directory. Then we’ll set up npm, answer the questions asked and it should create a package.json for you.
npm init
Then we’ll create the other two important files in this project, index.js which will be our main file and action.yml, which we’ll be using later when we’re setting up the GitHub action. We also need to create a .env file that has our environment variables for local development.
Install the dependencies
We’ll need a few packages for this project, how they’re used will become clear as you progress through this tutorial
npm i @octokit/rest axios dotenv wrap-ansi
2. Updating the Gist
Environment variables
Before we do anything else, first add the environment variables to the .env file. You can keep the DEV_USERNAME field empty for now.
You can store any API keys or secrets in this file. This file won’t be pushed to your repo, instead you’ll have to add the variables in this file as secrets under repository settings. Since I’m using the dev.to API, which doesn’t need an API key to get posts, I’m storing the username which is the only parameter you need to retrieve posts.
GIST_ID="<Your gist id>"
GH_TOKEN="<Your github token>"
DEV_USERNAME=""
Main script
Now we’ll write some code to update the gist we’ve created. Add this to index.js.
require('dotenv').config()
const { Octokit } = require("@octokit/rest");

// Get the environment variables
const {
    GIST_ID: gistId,
    GH_TOKEN: githubToken,
    DEV_USERNAME: devUsername
} = process.env;

// Authentication
const octokit = new Octokit({
    auth: `token ${githubToken}`
});

// Function to update the gist contents
async function updateGist() {
    let gist;
    try {
        // Get the gist you made using the gist id
        gist = await octokit.gists.get({ gist_id: gistId });
    } catch (error) {
        console.error(`Unable to get gist\n${error}`);
    }

    // Only one file was created, so fetch it's filename
    const filename = Object.keys(gist.data.files)[0];

    try {
        // Update the gist
        // The description is displayed when the gist is pinned
        // so we can update the description along with the contents
        // to show more information when it's pinned
        await octokit.gists.update({
            gist_id: gistId,
            description: `This is some description`,
            files: {
                [filename]: {
                    content: `This is some example content`
                }
            }
        });
    } catch (error) {
        console.error(`Unable to update gist\n${error}`);
    }
}

(async () => {
    await updateGist();
})();
To test whether this script works, run
node index.js
If you check your gist, the description and content should have updated to whatever strings you passed to the update functions.
3. Fetching the data
Now we’re going to shift our focus to getting the most recent post from our dev.to account. In index.js update/add these functions.
// The endpoint for the request
const baseURL = 'https://dev.to/api/articles'

// Parameters to pass to the dev.to api
const options = {
    params: {
        username: devUsername
    }
}

// This is useful if the string is too long to display on the pinned gist
function truncate(str, n){
    return (str.length > n) ? str.substr(0, n-2) + '…' : str;
};

// Get the most recent post
async function getPost() {
    try {
        const response = await axios.get(baseURL, options);
        const post = response.data[0];
        // Pass the post as a parameter
        await updateGist(post)
    } catch (error) {
        console.error(error);
    }
}

// Pass the post as a parameter
async function updateGist(post) {
    let gist;
    try {
        gist = await octokit.gists.get({ gist_id: gistId });
    } catch (error) {
        console.error(`Unable to get gist\n${error}`);
    }

    const filename = Object.keys(gist.data.files)[0];

    // Tags from the post
    const tags = '#' + post.tag_list.join(", #");

    // In the gist show the title, a short excerpt from the post
    // and the date the post was published in the contents of the gist
    const content = `📜 ${truncate(post.title, 60).replace(/\s+/g, ' ')} \n ▶ ${
        truncate(post.description, 100).replace(/\s+/g, ' ')
    } \n🔖 ${tags} \n📆 ${post.readable_publish_date.replace(/\s+/g, ' ')}`;

    try {
        //  In the post description show the username, number of likes and comments
        await octokit.gists.update({
            gist_id: gistId,
            description: `dev.to/${devUsername} | ❤ ${post.public_reactions_count} | 💬 ${
                post.comments_count
            }`,
            files: {
                [filename]: {
                    content: wrapAnsi(content, 60, { hard: true, trim: false })
                }
            }
        });
    } catch (error) {
        console.error(`Unable to update gist\n${error}`);
    }
}

(async () => {
    await getPost();
})();
The wrapAnsii library is used to wrap text that’s longer than a certain length. Otherwise the text will be abruptly cut off if it’s too long when pinned.
Pin the gist to your profile and then run this script. You should get something that looks like this.
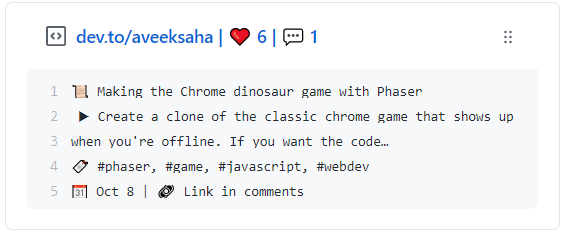
If you want to use a different API this step will vary for you, but the basic idea is still the same. Extract the data you need from the API and pass it to the update function so that it can display it on the gist.
4. Setup GitHub Action
Now we have a script that updates our pinned gist with the desired blog post, but we’re running it manually. Now we’ll set up a GitHub action with a cron job so that it runs on a schedule and updates automatically.
Setup run command
In action.yml we’ll set up node and the file that should be run using node.
name: blog-box
author: <your-username>
description: GitHub Action for updating a gist with your latest blog post.

runs:
  using: node12
  main: ./index.js
Setup workflow
Create a new folder under .github/workflows/ and add a GitHub action file named update.yml.
name: Update gist with latest songs
on:
  # THis option allows you to run the script manually
  workflow_dispatch:

  # This sets up a cron job that runs the script once a day
  schedule:
    - cron: "0 0 * * *"

jobs:
  # Create a job
  blog-box:
    runs-on: ubuntu-latest
    steps:
      - uses: actions/checkout@v2
      # Install dependencies
      - run: npm install
      - name: Update
        uses: ./
        # Use the secrets as environment variables
        env:
          GH_TOKEN: ${{ secrets.GH_TOKEN }}
          GIST_ID: ${{ secrets.GIST_ID }}
          DEV_USERNAME: ${{ secrets.DEV_USERNAME }}
If you want to find out more about cron jobs and how to schedule them, check out this website: https://crontab.guru/.
Conclusion
Once you push your changes, go to actions > Update gist with latest post > Run workflow in your GitHub repository. The action should run successfully and your pinned gist will show your most recent dev.tp blog post. The workflow will run at 00:00 UTC automatically every day.